Some time ago, I had to replace my ignition distributor. The whole story is pretty messy, but it started out as routine
maintenance (checking distributor cap, rotor, plugs, etc)... and I ended up damaging my ignition distributor in the process
of removing the ignition rotor. Just a heads up to you watercooled VW guys out there... apparently the ignition rotors
are glued onto the distributor shaft from the factory. When they are serviced by a dealership, they also glue on the
replacements. Seemed really silly to me at first, but then I remembered the 16 valve VWs, which have the distributors
mounted sideways, coming out of the cylinder head. I suppose that, in theory, the rotor might work it's way loose over
time in that case. Anyway, don't pull hard on your rotor - if it won't come off easily then break it into pieces with a
pair of pliers or something (don't get pieces down into the distributor body though!!!). I pulled real hard on mine and
after that my distributor got real bound up and the built-in hall sender stopped sending a signal. I replaced the distributor
with a used one I had hanging around, and this weekend I finally got around to setting the ignition timing.
The Bentley manual covers the procedure for checking and adjusting ignition timing quite well, so refer to it and you
should be in fine shape. Before doing this, make sure you have either an external tachometer or a friend willing to
help you. The ignition timing on Digifant II VWs must be set with the engine speed between 2000 and 2500 RPM, unlike
CIS and CIS-e VWs, which get set at idle. If you have a friend to help you, have them sit in the car and control the
throttle to raise the engine speed when necessary. I, on the other hand, use an old Heathkit tachometer / dwell meter
that my dad handed down to me. The meter is probably older than me - behold:

Before checking the timing, the engine must be up to operating temperature - basically, just run the engine until
the radiator fan has cycled on and off. Warm the engine up, then shut it off. If your tachometer or timing
light requires you to connect to the negative terminal of the ignition coil, then be especially careful not to
short the negative terminal of the ignition coil to ground, or you will damage the Digifant control unit. Really...
be careful. My heathkit tach needs one lead connected to the negative terminal of the coil, and the other lead to the
positive terminal of the car's battery. The negative terminal of the ignition coil should be clearly marked on
the coil itself - do
not assume positive or negative based on the color of the wire attaching to it. On
my 1991 Golf, the negative terminal is the one with the red wire attached, and the coil is rotated in it's strap
mounting so that the negative terminal is also closest to the firewall. In this picture, the arrow is pointing
to my negative terminal, which is just barely visible behind the other connections (click to make the photo
bigger):

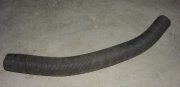
Now remove the timing plug from the top of the transmission bell housing. It should be easy to find - every
one I've seen has been made of bright green plastic. There is supposed to be a clear plastic plug that snaps
into the center, but these are often missing. If you have nothing plugging the inner hole in your timing
plug then you should get ahold of the small clear plug. It's important that the hole in the bell housing
is completely sealed during normal operation (it keeps crap from falling into where your clutch and flywheel are!).
The timing plug has a hex shaped inset that is made to accept a special tool for removal. You can either buy
the tool or make your own (a section of hex shaped stock in the right size would do it), or just use a pair
of slip-joint or channel lock pliers (but be careful not to damage the plug too much). Here is what the plug
looks like:


Here is a shot of the top of the bell housing with the timing plug removed and the timing hole circled
in red (click to make the photo bigger):

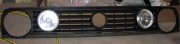
Now disconnect the coolant temperature sensor and optionally loosen the bolt at the base of the ignition
distributor. The bolt at the base of the distributor is what allows for adjustment of the ignition timing
(the entire distributor gets twisted around to make adjustments), so you can either loosen it now or
wait until after you've checked the timing and only make adjustments if necessary. In this picture,
the blue connector to the coolant temperature sensor (closest to the cylinder head) is circled, and
the hold-down bolt for the ignition distributor is circled (click to make the photo bigger):

Start the car back up and let it run for a moment - then briefly raise the engine RPMs over 2100 four times
in a row. Using the timing light aimed at the timing hole in the bell housing, you should see something for
markings on the flywheel. Also note that inside of the timing hole (just below the threads for the plug) there
should be a little "pointer". That pointer is what you want the timing mark on the flywheel to line up with.
This can be tricky, because timing marks on VW flywheels are not very well documented, and your A2 Bentley
manual likely does not have a picture or diagram of what you should be looking for. If you see something that
looks like a zero, then that's probably the top-dead-center mark. Your Digifant II VW needs to be set to
6 degrees before top dead center (BTDC), +/- 1 degree. The mark for 6 degrees BTDC will most likely appear
as a diamond-shaped recess cut into the flywheel - you will probably be able to locate your mark by playing
with rotating the ignition distributor in both directions (one direction advances, and the other direction retards).
My timing light aimed toward the timing hole (click to make the photo bigger):

Don't forget to tighten your distributor back down after making your adjustments, and reconnect that blue
connector going to the coolant temperature sensor. Again, be careful disconnecting any equipment connected
to the ignition coil. Here's one more pic, just for fun - it's Blue, in all her "wash me" glory:

Post your comments below. Please note that your comments will not be visible until
they have been approved by a moderator (me).
Date: 09/17/06, 20:16:24 PDT
From: Anthony
Comments: I need help wiring my digifant setup on my cabby A1, i took the digi setup off a 1990 jetta and installed it on my cabby, the problem is , is that there is a wire harness with 5 wires that used to go into the firewall of the jetta, its the only set of wires that enters the car from the complete wire harness for the digifant, the wires are / 1 solid red/ 1red with white stripe/ 1 red with yellow stripe/ 1 red with green stripe/ and 1 black with yellow stripe....the thing is is that those wires is what powers everything up , so my car is dead until i hook up thos main wires.....does anyone know about the digi setup and what i hook thos wires up to? i think the solid red is constant hot but im not sure....if someone could help me that would be awesome....thanks a million.
Anthony.
Date: 09/25/06, 17:46:38 PDT
From: max
Comments: Anthony, I sent you an e-mail.
Date: 06/12/10, 12:02:27 PDT
From: Christian Louboutin
Comments: Thans
for the nice post.