It's been a while since my last post. You may have noticed there is now
a link over to the left to get an
RSS feed. I
doubt anybody will subscribe, but hey - it's there if you want it.
So, the
new oxygen sensor
is now installed. Since the purpose of this blog is to document my mechanic-ing, here is a little writeup
outlining what was involved.
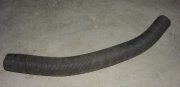
Here is the target of our operation, the old oxygen sensor. This is the upstream (or forward) oxygen
sensor so it lives, as you see here, threaded into the rear of the downpipe (just ahead of the catalytic
converter).

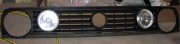
Here is a point-of-view that I'm all too familiar with.

Okay, step one is to unplug the electrical connector coming from the oxygen sensor. In this case,
the plugs for both oxygen sensors meet their mating plugs in the back of the engine bay, toward the side
where the airbox is mounted. The engine mount in that rear corner has a small bracket mounted to it
that the oxygen sensor plugs snap into, to keep them from floating around inside the engine compartment.
These two pictures are looking down past the air intake at the plug for the upstream oxygen sensor, disconnected
from it's mating plug. You can't see it, but just behind my hand in the second picture there is a brown
plug, which is the connector for the rear (downstream) oxygen sensor.


With the electrical connector unplugged, and the clips/zip-ties removed from from the wire, the sensor
itself can now be removed from the downpipe. In the first picture below, you can see a special oxygen
sensor socket slid over the sensor. Unless you're willing to cut the wire off the sensor, you need more
than just a really deep socket - you need one of these, which has a channel cut into it that lets the wire
get out of the way. Of course, you can also use an open-ended wrench if you happen to have one the right
size. It can sometimes be a real struggle to remove an old oxygen sensor. I usually have good luck
letting the car run for several minutes, and then squirting some penetrating oil (like PB Blaster or Aero Kroil)
around the mating surfaces. In this particular case, it worked quite well - very little effort was required
to remove the old sensor.


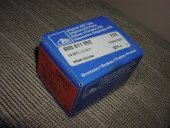
Here is the new sensor (Bosch, of course) - I recommend OEM for these things because I've heard too many
stories of people using aftermarket sensors that don't respond as quickly. For older cars, it's probably
no big deal, but for anything 1996 (OBD-II) or newer, that could be a problem. This Bosch sensor even
came with anti-seize compound on the threads - how nice is that!

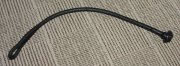
Here is the new sensor being installed.

With the new sensor installed, I fired up the vag-com software on the laptop again to take a look at things.
As expected, it showed that the upstream oxygen sensor was now perfectly within spec all of the time. Unfortunately,
I continued to get "multi-trim fuel bank too rich" DTCs when trying to set the readiness codes. Below is a
picture of the Go Mango laptop running the vag-com software. Notice the USB-to-OBD adapter running from the
laptop to the diagnostic port in the dashboard of the Golf.

I've been doing some research about this multi-trim message, and somewhere in the
VW Vortex
I found this really handy posting on the
ross-tech website:
http://www.ross-tech.com/vag-com/cars/fuel-trim.html.
It looks like I need to take a closer look at my Mass Airflow Sensor. I'm not getting any codes that indicate a
MAF problem, but it's worth checking at this point.
Post your comments below. Please note that your comments will not be visible until
they have been approved by a moderator (me).