Last weekend we took a trip to visit friends in Keene, which involved driving down
a particular stretch of Route 101 with a speed limit of 65mph. Traffic flow along
that section of road is pretty much 80mph. We were in our 1996 Golf, which currently
has a very short 5th gear installed - so 80mph is well over 4000rpm. After about
20 minutes of cruising with the engine at higher rpms, I noticed that the oil
pressure light started to come on every time we had to come to a stop and let the
engine idle. I had noticed for a while that the engine was starting to develop a
pretty nasty sounding knock (not like a knock caused by cheap gas or incorrect
ignition timing) and it seemed to be getting slowly worse. During this trip, it
was bad enough so that the motor pretty much sounded like a diesel at higher
rpms under light to medium load. Needless to say, I took it pretty easy on the poor
thing after that.
Now, poor oil pressure only at idle is often a sign that the main bearings are
getting worn beyond their allowable tolerances (or that they are badly scored). A worn or malfunctioning oil
pump is also a likely candidate. Our 96 Golf only has 125,000 miles on it, so
I was surprised to see this happening at all. The 96 and later ABA engines, though,
use lesser quality internals - so I wasn't going to rule out main bearing wear
without doing some checking. I talked briefly to Klaus and Wolfgang over at Atlantic
Imported Auto Supply about this, and they informed me of a fairly common problem
on these ABA engines. Apparently, the plastic oil baffle surrounding the pickup
tube for the oil pump is notorious for cracking and breaking, which can cause
small bits of that hard plastic to clog the screen at the end of the pickup
tube. They suggested that I pay close attention to that.
If my only symptom were the oil pressure (without the knocking and rapping), then
I would have assumed an oil pump problem... but the noise really made worry that
the main bearings were in tough shape. The only way to really tell is to tear into
the bottom of the engine block and investigate. My dad was in town, visiting for the
weekend, so we both spent Saturday doing a little bit of open-heart surgery on that
ABA motor in the 96 Golf.
The oil pump, main bearings, and lower rod bearings can all be accessed by removing
the oil pan. On these engines, the oil pan is quite easy to remove because there
are no exhaust pieces or subframes in the way. Behold:

You'll definitely want to drain the oil first:

All of the bolts holding the oil pan into place are easy to get to, except for the
two closest the transmission - those 2 can only be accessed by removing that small
aluminum plate covering the very bottom of the bell housing. That plate is very easy
to remove and once it's out of the way you get to those 2 tricky bolts by using a
"wobble" extension (a socket extension with the end formed so that the socket will
wobble just a few degrees in any direction). On the ABA engines (and some others)
you can use either a socket or a torx bit to remove the bolts. They use nice bolts
that are 6 point on the outside, and torx (star) on the inside. So no need to panic
if some of them are stripped out! Oil pan bolts being removed:

Here is a closeup of the head of one of the oil pan bolts:

Even after all the bolts are removed, oil pans can be a pain to break loose. The gasket
material often causes it to stick, but enough persistence will get it done. The oil pump
will be in plain sight, staring you in the face once the oil pan is removed. The two larger
bolts going up through the bottom of the pump body are the ones that fasten it to the engine
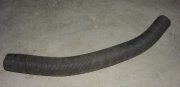
block - remove those, and it will slide right out. Do not try to remove that plastic
baffle around the pickup tube unless you absolutely have to. It's quite difficult to remove
without cracking the clips that hold it in place. Here is a view of the bottom of the oil
pump and pickup tube/baffle.

And here is a view of the top of the pump, showing the input shaft and the teeth of the pump
gears (which actually pump the oil):

If you look closely at the picture showing the pickup tube, you can see a couple of dark flecks
caught in the screen. We also found pieces of old gasket material in the oil pan. If enough of
that junk got sucked up against the pickup tube screen, that could really inhibit oil flow and
cause poor pressure... however, I couldn't really see that being the problem in this particular
case (where oil pressure rises again as the engine rpms are raised slightly). It seems like
a blockage against the screen would keep restricting oil flow through all engine speeds, until
the blockage had a chance to fall back away from the screen. Here is the inside of the oil pan
with a little bit of oil pooled inside - even though there is a lot of junk floating around in
it, you really can't see it in the picture:

The plastic pickup tube baffle showed no signs of being cracked or broken, and we could find
no trace of that hard, black plastic in the oil. Since the oil pump was out anyway, I decided
to check it out using the procedure from the Bentley book (
the VW shop manual),
which involves measuring the backlash and the lateral play of the pump gears. It all checked
out - the pump had minimal (if any) wear. At this point, I was excited to measure the main
bearing tolerances. The main bearing caps can be seen clearly with the oil pan and oil pump
removed, as seen here:

The bearing shells farthest away from the oil pump will normally exhibit the most wear, so
we started by measuring the clearance of the #2 bearing (#1 bearing cap is a little more
difficult to remove - more on that in a moment). Plastigage is used to measure the bearing
clearance - it's just a thin strip of plastic that gets installed, sideways, between the
crank journal and the wear surface of the bearing shell. When the bearing cap is torqued down,
the plastic gets squashed. The bearing cap is then removed again, and the width of what remains
of the plastic strip is used to judge the clearance. Here is the #2 crank journal, with residue
from the plastigage still visible:

And here is the #2 bearing cap with the bearing shell still showing the plastigage:

Even though the wear was still within spec, there was visible scoring that went well down
into the copper layer of the bearing.
The #1 main bearing cap is tricky, because the heads of the bolts are so close to the plate that
covers the front main seal. The space is so tight that a socket will not fit around the bolt head.
An open-end wrench can be used (barely), but that is not recommended (you run the risk of rounding
off the bolt heads). The #5 bearing cap is even worse to get to - not only is it very close against
the plate for the rear main seal, but it's also right up against the toothed wheel that triggers
the crankshaft position sensor. The only way to remove #5 without splitting the engine and transmission
and removing the clutch and rear main seal plate is to use a socket with very thin walls. A thin
walled socket is also really the only good option for the #1 cap. My dad has a real knack for hacking
together special tools and modifying tools for special purposes, so he butchered one of my 1/2" drive
17mm sockets on the bench grinder, and we ended up with a magnificent thin-walled socket:


That couldn't have worked any better for those stubborn #1 and #5 bearing caps. We plastigaged the
#1 bearing and found it to be a little more worn than #2, although still within spec. That scoring
on #2 worried me, so I decided it was worth the little extra effort to change the main bearings
while we had everything apart. #4 was also scored (even worse than #2), and #5 turned out to be
the most worn (surprising, as it's closest to the oil pump). We didn't bother plastigaging #5, since
I had already made up my mind I was replacing all of them. Here is the very strange thing I found, though.
The ABA main bearings are each made up of 2 bearing shell "halves". The upper halves all have oil
passageways in them, and all of the lower shells are solid... except for #3. #3 has the
grooved shells both top and bottom. This is clearly stated in the Bentley manual. The lower shell
of the #3 bearing that I removed from this engine was
not grooved - it was solid. I have
no idea why.
The trickiest part was removing and reinstalling the upper shells (between the crank journals and
engine block), but we managed. By the time the sun started to set, I was done installing the main
bearing caps, oil pump, and oil pan. After re-tensioning the timing belt and adjusting the power
steering belt tension (it was getting kind of sloppy), we were ready to fire it up. We started it
and let it run for a few seconds, and the oil pressure light was on constantly, regardless of
engine rpm. We figured it was just the oil pump being dry, and since we had used plenty of assembly
lube when installing the new bearings, we gave it another 30 seconds or so of running to try and
build some pressure. No luck. You know the kind of tricks your mind plays when things like this
don't go like you expect - you start to backtrace and think of anything that you could have done wrong.
What a lousy feeling. Everything had gone very well up until this point. Finally, we removed the
ignition distributor and rigged up a device to drive the oil pump using an electric drill. After
lots and lots of spinning, we seemed to have resistance in the pump again (it felt like it was drawing
oil). So we reinstalled the distributor and gave it another try... and success! We had oil pressure
and the motor sounded great - no more ugly rapping noises. The Golf has made quite a few small trips
since then, and it just runs great. I'm happy.
Post your comments below. Please note that your comments will not be visible until
they have been approved by a moderator (me).
Date: 04/07/07, 23:11:15 PDT
From: Vince Waldon
Comments: Hi there... I have the head off my 92 Jetta (the engine is still in the car) and I'm going to deglaze, re-ring, and new con bearings as well while it's all apart. The beast has 250k kms on it so it's due.
I'm thinking of doing the main bearings as well... so close at this point... but am a little chicken... I can see popping the lower bearings off no problem (especially with a specially ground 17mm.. great idea !) but I can't quite figure out how you'd get the upper bearings shells out without gouging them ?? Especially #3 with the thrust ridges ??
Sounds like you had no problems though... any words from the wise ?
thanks for any advice you might be willing to offer...
Vince
Date: 04/08/07, 07:59:48 PDT
From: Max
Comments: Hi Vince, it's always great to hear from a fellow amateur mechanic! Regarding the upper main bearing shells, you are right - that can be tricky, but it is very do-able if you are patient and a little bit clever. Basically, you need to "chase" the upper shells around to the bottom of the crankshaft journal. You can use something like a very small flat-head screwdriver to start pushing them, but obviously you'd need to be incredibly careful not to scratch the crank journal in the process (also keep in mind that you will only be able to push the bearing shell in one direction, since one side should have a little tab bent upward to keep it in place). Once you get the bearing shell pushed around a little bit, you can use a piece of fairly strong (yet still flexible) plastic to finish chasing it until you can grab it from the other side. I used a strip of plastic cut out from a laundry detergent container (I don't know which country you are in, but over here laundry detergent tends to come in jugs made out of fairly thick, flexible plastic). Make sure all of your main bearing caps are quite loose (or completely removed) while chasing the upper shells, that way the crankshaft is supported only by the timing belt, front oil seal, rear oil seal, and (to some extend) the flywheel/clutch assembly. That will hopefully relieve enough of the force on the upper bearing shells so that they will chase around without too much effort. Don't be afraid to pull down on the crankshaft a little bit if you need to relieve more force on the bearings. If necessary, you can also relieve some force by loosening your timing belt tensioner (just don't forget to re-tension it afterward, like I nearly did). Should you decide to do it, then I hope it goes well for you!
Date: 04/18/07, 18:47:51 PDT
From: Nathan
Comments: What are the reddish orange pieces of "ceramic" in the bottom of my oil pan? Like small broken fragments of something ceramic.
I have recently had ignition system problems and continually tried to start my car with no luck until I finally replaced the coil.
After replacing the coil my car ran just fine..UNTIL... My oil pressure light and buzzer started goin crazy.... I figured it was prolly that I just needed to replace the sensors/switches..
But come to find out it was appearently low oil pressure because the engine has started to sound a little bit noisey. When I pour oil in the crank case on the top of the engine it quiets down pretty significantly...
I figured maybe replace the oil pump.. But when I opened the oil pan it had a bunch of carbonlike stuff and small Orange ceramic-like pieces in it.
The car runs fine and doesnt blow smoke. Its just almost diesel sounding but not quite that bad.
What could be the deal here ?????
AND THANK YOU FOR YOUR AWESOME WEBSITE !!!!
Date: 04/18/07, 18:54:00 PDT
From: Nathan
Comments: Actually your thread here about open heart surgery on you 1996 Golf sound prettymuch just like my issue..... Did you replace the oil pump with a new one? Or did you just use the one that was already in it after cleaning out you oil pan?
Date: 04/19/07, 08:29:34 PDT
From: max
Comments: Hi Nathan, first, I refer you to a post from this past February about replacing the connecting rod bearings in this same car (96 Golf): http://www.digitaldownpour.com/blog/projects/a3_golf/2007-02-04_rodbearings.html?showcomments=y
Toward the bottom of that post, there is a picture of debris that I found in my oil pan as well. I had black bits and reddish bits. The black bits appeared to be old gasket material, but the redish/brown bits were really hard. Do those pieces in the picture look like what you had in your oil pan? If so, I'd say those are pieces from broken dipstick tubes. If you've ever had to replace the plastic dipstick tube end on a VW before, you probably know what I mean. The tubes are prone to breaking, which can let bits of that plastic down into the oil pan. The tubes are always either dark red or orange plastic. Often times the new ones will break into pieces as soon as you try to install them. They're complete junk. I would guess that's what those pieces are in your oil pan. The plastic does get very hard when it sits in that hot oil for such a long time, so it may feel like it's too hard to be plastic.
As far as your engine oil pressure, have you eliminated the possibility of the sensor being faulty? There's really no good way to test those sensors (unless you have a seperate, external pressure guage hooked up to compare against), but they are so cheap that I recommend just replacing it anyway. Check out http://www.thepartsbin.com/ to see what a sensor will cost for your car - it should be less than . There are 2 pressure sensors, one for high pressure and one for low pressure - low pressure sensor is on the side of the cylinder head (for 4 cylinder VWs, at least) and the high pressure sensor is down near the oil filter. Once you know your low pressure sensor is good, you can be sure you have a low oil pressure problem if the light still comes on.
That brings us to the next part. If your low pressure warning sort of flickers on when the engine is at idle, but goes away once you raise the engine RPMs a little bit, then it's likely your main bearings that are the problem. It can be hard to tell from the symptoms whether the oil pump or the main bearings are the culprit, but if you have a diesel-sounding engine noise then that's also a good indication that the main bearings may be quite worn, and in that case I would highly recommend changing the lower rod bearings too as they tend to be more responsible for those kind of noises than the mains. The only real way to tell for sure is to pull that oil pan off, remove your oil pump, and check the backlash and end-play of the oil pump gears. Your Bentley manual will have the tolerances for those measurements. If the pump is worn past or close to the tolerences, then spring for a new one (should be about or so). When re-installing the oil pump (whether it's new or used), pack it with Vaseline first (it's petroleum based, so it won't harm anything). That will keep it primed so that it won't starve your engine for oil when you start it back up. Next, start investigating your bearing conditions. The lower rod bearings are easiest to do (and are worth doing), but they don't have any effect on your oil pressure. The main bearings are a little more of a challenge, but as long as you're careful and use common sense (and have a thin-walled 17mm socket), it should be do-able. You can start by plastigaging the bearings to see what you have for clearances, but the reality is that main and rod bearings are cheap and you have to separate the bearings to plastigage them anyway... so why not just replace them while you're in there. Make sure to inspect all of the crankshaft journals (bearing surfaces on the crankshaft) for pitting or scoring. If there are any marks or scoring that you can feel by scraping your fingernail across them, then you need to have the crankshaft resurfaced. Even what look like small scores along the crank journals can cause low oil pressure even with brand new bearings. If you need to have the crank resurfaced then you'll have to seperate the transmission, remove the clutch, and remove your accessory belts and timing belt in order to physically remove the crank shaft. You can leave the pistons and connecting rods up in the cylinder bores, or you can pull them out and replace the piston rings while you're in there - that's your call.
So as you can see, this could potentially turn into a bottom end rebuild. If your car is an OBD-I A3 (Golf or Jetta from 1993 through 1995 model years) then the crankshaft is a high quality forged unit, and it's pretty unlikely that it will have damage. Even if the bearings themselves are scored, that doesn't necessarily mean the crank surface will be - so check those surfaces carefully. There's no harm in taking the bearing caps off to see what the crank surfaces look like - you can always just put it all back together and get rid of the car if it looks like it will turn into more work than you want to put into it.
Good luck, and thanks for posting your comments!
Date: 04/19/07, 08:33:29 PDT
From: max
Comments: Nathan, while I had the oil pump removed, I checked the backlash and end-play of the pump gears according to the specs in the Bentley manual. Mine checked out well within spec, so I reused it. Don't be afraid to reuse parts if they are still within spec. Obviously, you'd want to inspect the pump for signs of physical damage as well, but they usually don't get damaged like that - just worn.