Last season I ordered a
MissingLinkZ solid shift kit
(an all metal shift linkage with spherical rod ends) along with MissingLinkZ teflon bushings for the relay shaft,
UHMW poly selector "ball" and teflon poly bushing for the main shift rod. I also ordered a factory "rebuild kit"
for the lower end of the shift lever. Soon after receiving the parts (which turned
out to be pretty nice quality), I installed everything except for the bushing for the main shift rod (the rod
that goes from the gear shift lever up into the engine bay) and the shift lever rebuild kit. To install those
parts on my A2 requires the exhaust system to be disconnected and dropped, the exhaust heat shield to be removed,
and the shifter box/lever/rod (the whole linkage from the passenger compartment to the engine compartment) to be
removed. I wanted to wait until I had a replacement part for my reverse gear lock-out so that I could do that at
the same time. It's a plastic piece pop-riveted the shifter "box" that is much easier to drill out and remove
with the box removed from the car.
So this weekend I decided it was finally time to replace that bushing, install the shift lever rebuild kit, and
fix my reverse gear lock-out. I worked at a pretty leisurely pace all day Friday (had the day off from work)
and then finished bolting the exhaust back up this morning (Saturday, that is).
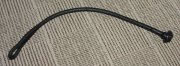
Here is a shot of the engine bay, in which you can see some of the MissingLinkZ kit - especially that nice billet
weighted shift rod painted with silver
Hammerite. The kit is
great, and made a huge difference in the feel of the shift linkage - no more A2 slop! This kit is nice because
it eliminates rubber bushings in the factory linkage by using all metal spherical rod ends instead.

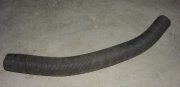
Here is a shot of the exhaust disconnected between the catalytic converter and header, and the heat shield
removed. To get my exhaust to drop down far enough, I had to disconnect all the hangers. Even then, the heat
shield was tricky to get out without damaging it

With the heat shield removed, you can see the bottom of the shift box and the main shift rod coming out of it:

Four bolts hold the shift box to the body of the car - when you remove them, the whole box will drop down:

At the other end of the main shift rod, just going up into the engine compartment, there is a clamp arrangement
that provides adjustment and fixes the main shift rod to the rest of the shift linkage. In all factory A2 Golf/Jetta shift
linkages (except for 1992 and some 1991 - they have additional adjustment) this is the only point of adjustment - you can adjust both side-to-side
and front-to-back throw of the shift lever. Here is a shot showing the clamp arrangement and the single bolt that
hold it in place. Remove the bolt completely and the sleeve clamp will slide off the end.

With the shift box disconnected and the main shift rod unclamped, the struggle to remove the whole assembly can begin.
Most of the work is trying to squeeze the shift box down past the exhaust. Don't forget that the shift lever is still
sticking way up out of the top of it, so that really makes it awkward to remove. If you can work your exhaust all the
way to the side, then it won't be as bad. My exhaust, however, barely moved aside enough to get the box dropped
down.
With that whole mess of shift box, main shift rod, and gearshift lever removed from the car, my next job was to
remove the gearshift lever from that whole assembly. There are two small nuts holding the shifter base to the
shift box and once those are removed the whole shift lever can be worked free. Kind of tricky because you have to sort of muscle it out
while sliding the main shift rod back at as extreme an angle as possible. It's hard to describe, but pretty obvious
once you have everything out where you can see it. Carry on sliding the shift rod back to remove it from the shift
box. I removed it completely so I could clean up the box and the bushing mounted in it. You'll want to replace that
if if it's worn, brittle, or broken. Here is my shift box with the shift lever and main shift rod removed:

In the picture above you can see the white piece of plastic pop-riveted to the shift box - that's my old, broken
reverse lock-out. You can just barely see part of the shifter base in the bottom of the box - it's a plastic and
rubber piece that simply presses into the bottom of the box and acts as a seat for the mating part of the shifter
base (a plastic ball on the bottom of the lever). My rebuild kit for the shifter base included this piece, so I
removed the old piece just by working it out from the bottom. The new piece slid in from the top quite easily.
And here is my shift lever with the replacement shifter base ball installed - the ball is the mating part for that
piece pressed into the bottom of the box that I mentioned above. The ball is spring loaded so to remove it you
have to keep it pressed "upward" (toward the top of the lever) and drive the roll pin out of the bottom of the lever
and then the ball will slide right off the end.

Here is a side-by-side comparison of my old, broken reverse lock-out piece and the replacement piece that I found
from another car. You can see that the piece on the left is complete and has a tab to keep the shift lever from
engaging reverse unless the lever is pressed down. The piece on the right, obviously, has had the tab broken off.
This is common for older VWs and will make it difficult to get into first gear and possibly even cause you to
shift into reverse without realizing it. To remove the old piece, just drill the heads off the rivets (the rivets
in mine were copper).

You can pop-rivet the new piece back into place like I did, or you can use short bolts and
nuts. If you use bolts, install them so the heads of the bolts are on the
inside of the shift box and you
may even have to grind the heads down so they don't stick out as far. Otherwise they may interfere with the shift
lever's movement. I prefer rivets for this because the head ends up nice and flush rather than sticking out.
Here is my shift box with the replacement piece riveted into place:

The last part of my chore was to remove the bracket for the relay shaft which mounts to the top of the steering rack.
The main shift rod passes through a bushing in this bracket, and it's that bushing I needed to replace with the new
teflon part. There are three bolts that hold this bracket to the steering rack. The two in the back you'll have to get
from under the car, and having the exhaust system and main shift rod out of the way first really helps get to them.
The third bolt is trickier (in fact, it's even tricky to locate at first) and I could only get to it by leaning over
the engine bay and reaching down to it with a long extension on my ratchet. The bushing is held in place by a metal
shell pop-riveted over it and if you were replacing it with a factory-like rubber bushing then you could just slide
the old one out and slide the new one in. My replacement teflon bushing, though, was rock solid so it could not
squeeze into place like that. These MissingLinkZ shift rod bearings come with two short bolts and nylon-insert nuts
because of this. I had to drill out the rivets, swap the bushings, then use those bolts and nuts in place of the pop
rivets. I could have pop-riveted it back together, but the bushing came with those nuts and bolts so I decided to
put them to use. Here is a picture of the relay shaft bracket with the new teflon bushing sitting loosely in place.
Next to the bracket is the metal shell that holds the bushing in place:

From there on, it was a matter of putting everything back together. Reinstalling the relay shaft bracket, installing the
shift lever and main shift rod back into the shift box, then working the shift box back into place while routing the
main shift rod back through the relay shaft bracket, and then reinstalling the heat shield and putting the exhaust
back into place. The shift lever base rebuild kit and teflon main shift rod bearing made quite a difference in the
feel. Gear selection is firm, positive, and smooth. As close to perfect as you'll ever get in an A2, methinks. And having
a working reverse lock-out is just great - that alone is worth all the work involved.
Post your comments below. Please note that your comments will not be visible until
they have been approved by a moderator (me).
Date: 05/07/06, 11:58:14 PDT
From: attila varadi
Comments: ait is a very good describtion
Date: 05/15/07, 10:35:33 PDT
From: Mike Reid
Comments: Great Data and info.
Just fixed the shift linkage on my Daughters 92 Diesel Golf.
Your info advice and photos were invaluable,.
Thanks ever so much!
Mike
Date: 07/13/08, 23:56:41 PDT
From: Mauricio G.
Comments: I was recently able to fix the shift linkage on my 92 gl golf but that`s only tnks to your site, it was the most important tool.
thanks again!